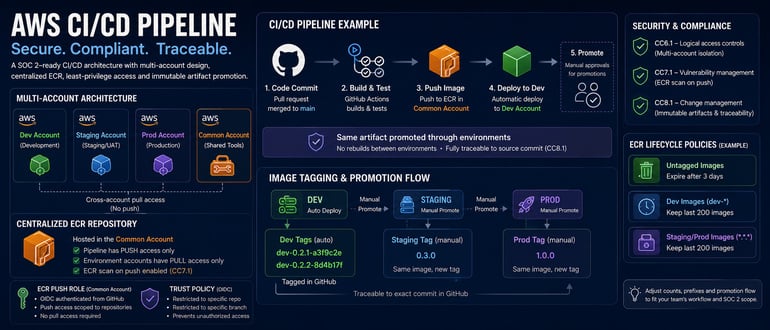

CI/CD pipelines make developers’ lives easier and let them ship changes to end users faster. However, they are also part of compliance frameworks such as SOC 2, which require careful design to satisfy specific controls.
AWS Account Architecture
You don’t want to host all your environments, such as staging and prod, in the same AWS account but rather use a multi-account AWS architecture.
Each of your environments — dev, staging, UAT, prod — should live in its own separate AWS account, rather than having all of them share a single account. This way, you can have clean logical access controls (CC6.1).
Once each environment has its own account, a natural question follows: Where should your ECR repository live? Should you host one in each environment account or centralize it in a single account that all environments pull images from?
ECR Repository Architecture
You could host your ECR repository in the prod environment account, but ideally, you should create a separate AWS account for shared tooling and host your ECR repository there. Your pipeline should only have push access to that repository, scoped to the common account.
Each environment account (dev, staging and prod) then needs cross-account permissions to pull (not push) images from that shared repository. In the common account, create an IAM role that authenticates via OIDC and can push to the relevant ECR repositories. This role doesn’t need pull access.
An example permissions policy for that role is as follows:
{ "Version": "2012-10-17", "Statement": [ { "Sid": "AllowECRAuth", "Effect": "Allow", "Action": "ecr:GetAuthorizationToken", "Resource": "*" }, { "Sid": "AllowPushToScopedRepos", "Effect": "Allow", "Action": [ "ecr:BatchCheckLayerAvailability", "ecr:PutImage", "ecr:InitiateLayerUpload", "ecr:UploadLayerPart", "ecr:CompleteLayerUpload" ], "Resource": [ "arn:aws:ecr:<REGION>:<COMMON_ACCOUNT_ID>:repository/myapp-*" ] } ]}
ecr:GetAuthorizationToken has to stay scoped to all resources since AWS doesn’t support restricting that specific action to a repository ARN. It’s how the ECR login token is issued. Everything else is locked to the specific repository naming pattern, not a bare wildcard.
The trust policy below is what actually enforces who can assume this role. It defines exactly which GitHub repository and branch is permitted to authenticate via OIDC. Without this scoping, any workflow in your GitHub organization could potentially assume the role.
{ "Version": "2012-10-17", "Statement": [ { "Effect": "Allow", "Principal": { "Federated": "arn:aws:iam::<COMMON_ACCOUNT_ID>:oidc-provider/token.actions.githubusercontent.com" }, "Action": "sts:AssumeRoleWithWebIdentity", "Condition": { "StringEquals": { "token.actions.githubusercontent.com:aud": "sts.amazonaws.com" }, "StringLike": { "token.actions.githubusercontent.com:sub": "repo:<GITHUB_ORG>/<GITHUB_REPO>:ref:refs/heads/main" } } } ]}
The sub condition is what actually locks this down. It ensures that only workflows running against the main branch of this specific repository can assume the role. You can modify this role later or create new ones as you add more GitHub repositories and their corresponding ECR repositories.
Last, make sure ‘scan on push’ is enabled on your ECR repository. This ensures that every image is automatically scanned for known vulnerabilities the moment it’s pushed, rather than on a periodic schedule. It’s a direct piece of evidence for CC7.1 (vulnerability management).
ECR Life Cycle Policies
Set up life cycle policies so your ECR repository doesn’t grow indefinitely and rack up storage costs. Don’t use one blanket rule though, since untagged images, dev builds and promoted releases have different retention needs.
Expire untagged images within a few days; they have no ongoing value. For dev-tagged images, size the retention count to your actual dev cycle rather than guessing a fixed time window. If your team iterates through many builds before settling on one to promote, keep a larger count (500–1,000); if your dev cycles are short, a smaller count (100–200) is fine. For staging- and prod-tagged images, keep the last 100–200 releases regardless of age, since these serve as your audit trail.
{ "rules": [ { "rulePriority": 1, "selection": { "tagStatus": "untagged", "countType": "sinceImagePushed", "countUnit": "days", "countNumber": 3 }, "action": { "type": "expire" } }, { "rulePriority": 2, "selection": { "tagStatus": "tagged", "tagPrefixList": ["dev-"], "countType": "imageCountMoreThan", "countNumber": 200 }, "action": { "type": "expire" } }, { "rulePriority": 3, "selection": { "tagStatus": "tagged", "tagPatternList": ["*.*.*"], "countType": "imageCountMoreThan", "countNumber": 200 }, "action": { "type": "expire" } } ]}
ECR evaluates rules in priority order, and each image is expired by the first rule that matches it, so the order and tag prefixes matter. Adjust the dev- prefix and the numbers to match your own tagging convention and release cadence.
Now you can design your pipeline based on how your team works. Here’s one example, assuming you have dev, staging and prod environments.
CI/CD Pipeline Architecture Example
When a pull request merges into main, the pipeline deploys to dev. Use image tagging, for example semver, so each dev build gets a dev- prefix, a patch version and the last seven characters of the commit SHA. Dev image tags in ECR would look like this:
dev-0.2.1-a3f9c2edev-0.2.2-8d4b17f
Each of these tags should also be tagged in GitHub so you can show an auditor exactly which commit was running in a given environment at a given time.
Once you’re happy with a dev version and want to promote it to staging, use a manual workflow trigger that retags that specific dev image, passing the target minor version as a parameter (no commit SHA needed). For example, dev-0.2.2-8d4b17f gets a second tag, 0.3.0. This is the same image with two tags, not a new build, which is the point: You’re promoting the exact artifact that was tested in dev, not rebuilding it.
If you find that dev, staging and prod need genuinely different images, that’s usually a sign of a design problem elsewhere in the pipeline. The better fix is to parameterize whatever differs between environments (config, environment variables or feature flags) rather than building separate images per environment.
Say staging runs integration tests, load tests and whatever else is part of your pipeline, and you’re ready to promote to prod. Use another manual workflow trigger, ideally with a required approval step that retags the same image with a version bump. For example, 0.3.0 gets a third tag, 1.0.0. At this point, the same image carries three tags: dev-0.2.2-8d4b17f, 0.3.0 and 1.0.0.
Now you’re running the same artifact in prod that was tested in dev and staging. It’s also traceable back to the exact code version running on GitHub, satisfying CC8.1 (change management).
Conclusion
This covers a common CI/CD pattern, not a one-size-fits-all blueprint. Your account structure, tagging scheme and life cycle rules should reflect how your team actually works. Review this against your own SOC 2 scope and controls and adjust it where your workflow genuinely differs.
Keep in mind that this is only the CI/CD part of SOC 2 on AWS. Achieving complete SOC 2 compliance on AWS requires considering more details such as GuardDuty, Security hub and more tools.