I’ve been exploring GitHub Copilot’s modernization capabilities for .NET and Java applications, and I wanted to share what I’ve learned about the most critical piece of the puzzle: the assessment document.
Here’s what makes this tool interesting – it’s not just a code suggestions engine. It’s an agentic, end-to-end solution that analyzes your entire codebase, writes an assessment document, builds a migration plan, and can provision the Azure infrastructure to run it. The experience follows an Assess → Plan → Execute model, and I’ve found that assessment is the foundation everything else builds on.
At each step, a document is generated with Copilot’s findings and recommendations. You can interject at this point and provide feedback, enhancements, and corrections to assist GitHub Copilot for the next phases of your migration. Copilot gives you the opportunity to steer it so that your migration completes with the results you’re seeking.
The tooling ships through a VS Code extension (generally available for both .NET and Java) that puts the full modernization workflow directly in your editor: running assessments, migrating dependencies, containerizing apps, and deploying to Azure. There’s also a Modernization CLI in public preview for terminal-based and multi-repo batch scenarios, but for this post I’m working on one project in Visual Studio Code.
The assessment document is the most important artifact the tool produces, and I’m blown away by what insight it gives me. It reports what gets upgraded, what Azure resources get provisioned, and how your application gets deployed. Everything downstream – infrastructure-as-code, containerization, deployment manifests – takes its cues from what the assessment finds. I’ve found that understanding how to configure, read, and act on this document is the single highest-leverage skill in the modernization workflow.
Two Paths In – Recommended Assessment & Upgrade Paths
The VS Code extension gives you two ways to kick off an assessment. They lead to the same interactive dashboard, but they differ in how much configuration you want to do upfront.
Path 1: Recommended Assessment (Fast Start)
This is the “show me what I’m dealing with” path. No manual configuration required.
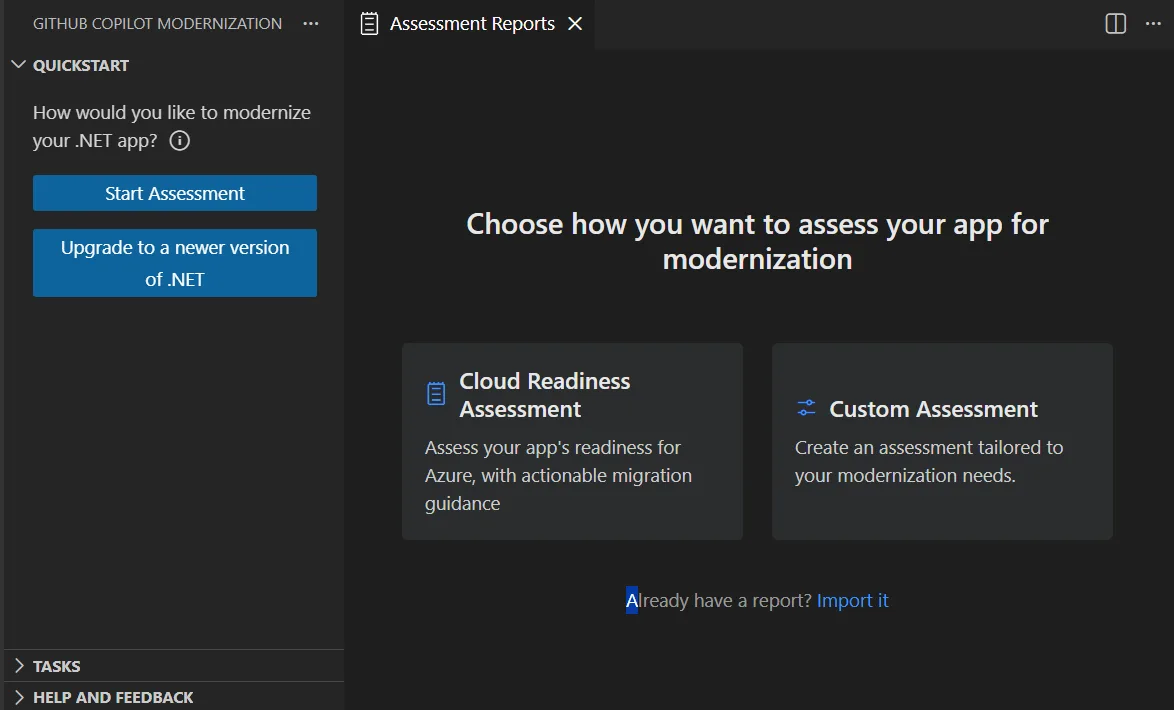
The Quickstart section with Start Assessment option in VS Code
- Open the GitHub Copilot modernization pane in VS Code.
- Select Start Assessment (or Open Assessment Dashboard) from the Quickstart section.
- Choose Recommended Assessment.
- Pick one or more domains from the curated list – Java/.NET Upgrade, Cloud Readiness, Security – and click OK.
That’s it. The assessment runs against your codebase and results appear in the interactive dashboard. Each domain represents a common migration scenario with preconfigured settings, so you get meaningful results without touching a single configuration knob.
This felt like the right starting point when I just wanted a quick read on where an app stands before committing to a migration strategy.
Path 2: Custom Assessment (Targeted)
When you already know your target – say, AKS on Linux with containerization – the custom assessment lets you configure exactly what to analyze.
Select Custom Assessment from the assessment pane, then dial in:
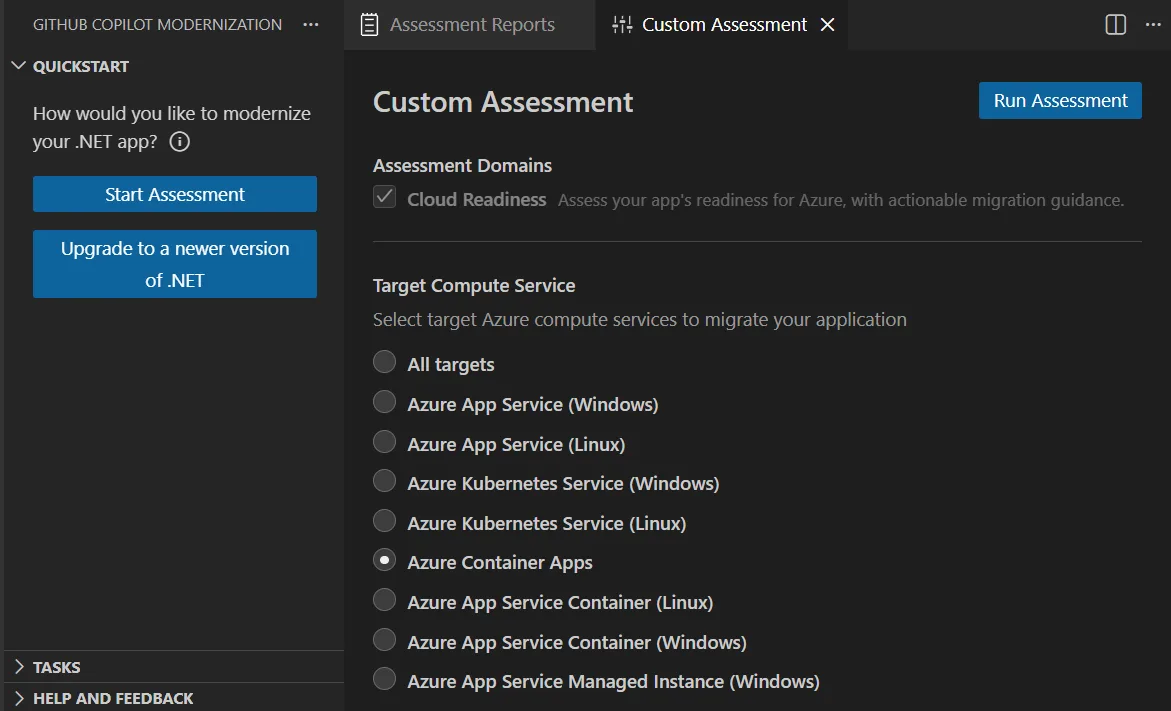
Custom assessment lets you target specific compute options and analysis domains
| Setting | Options |
|---|---|
| Assessment Domains | Java/.NET Upgrade, Cloud Readiness, Security – pick one or combine all three |
| Analysis Coverage | Issue only – just the problems. Issues & Technologies – problems plus tech inventory. Issues, Technologies & Dependencies – the full picture. |
| Target Compute | Azure App Service, Azure Kubernetes Service (AKS), Azure Container Apps (ACA) – pick multiple to compare side-by-side |
| Target OS | Linux or Windows |
| Containerization | Enable or disable containerization analysis |
When you select multiple Azure service targets, the dashboard lets you switch between them to compare migration approaches and view service-specific recommendations – that’s pretty slick when the hosting decision hasn’t been finalized yet.
I use this path when I know I’m going to AKS on Linux and I want to know exactly what’s blocking that.
Upgrade Paths the Assessment Covers
The assessment isn’t just about cloud readiness. It also evaluates framework and runtime upgrade paths with specific issue detection rules and remediation guidance:
- Java: OpenJDK 11 → 17 → 21, Spring Boot 2.x → 3.x
- .NET: .NET Framework → .NET 10, ASP.NET → ASP.NET Core (see the .NET porting guide and ASP.NET Core migration guidance)
Each upgrade path has its own set of detection rules – the tool knows, for instance, which APIs were removed between JDK 17 and 21, or which ASP.NET patterns have no direct equivalent in ASP.NET Core.
CLI note: If you need to assess dozens of applications across multiple repos, the Modernize CLI supports a
modernize assess --multi-repomode that reads arepos.jsonmanifest, clones all listed repositories, and generates both per-app reports and an aggregated cross-portfolio report. For single-app work, though, VS Code is where I stay.
The Assessment Document
Ok.. let’s dig in. This is the artifact that matters most.
Every planning decision, every IaC file, every deployment manifest traces back to what the assessment found. I’m going to walk you through it in detail.
Where It Lives
Assessment reports are stored in your project directory under:
.github/modernize/assessment/Each assessment run produces an independent report – you build up a history, not overwrite previous results. This means you can track how your migration posture evolves over time, or compare results after making code changes. I really like this approach.
Report Structure
The assessment report is organized into a header section and four analytical tabs. Let’s take a look at each one.
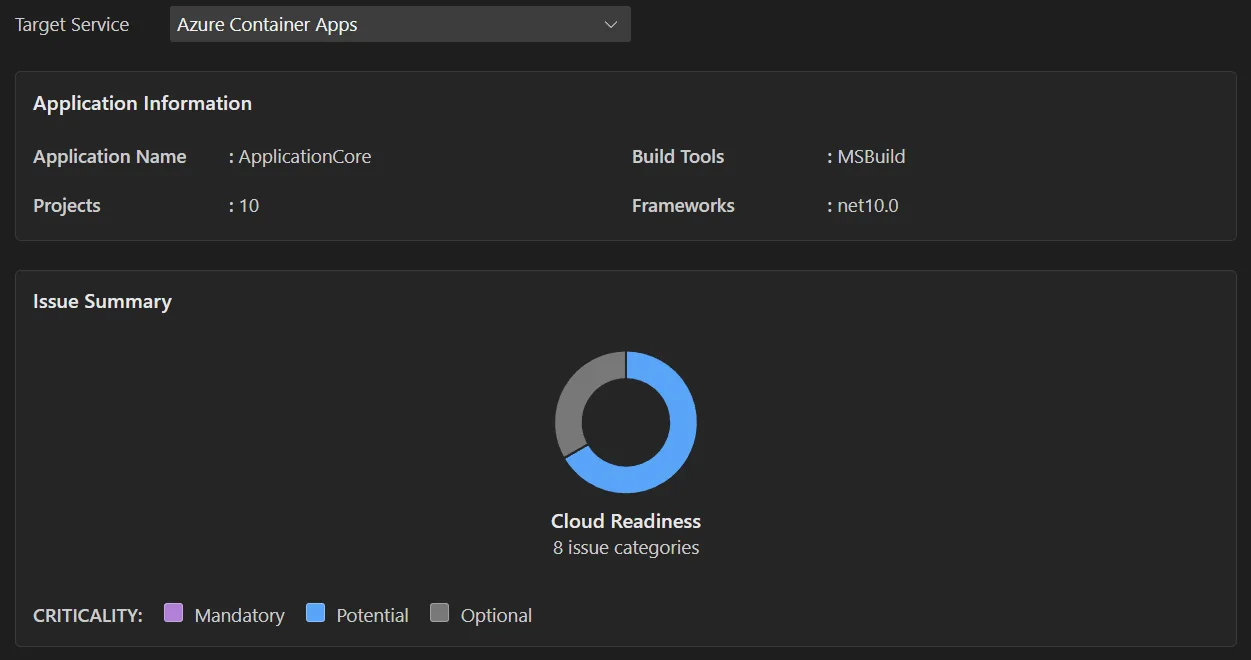
Application Information – The Snapshot
The top of every report captures your application’s current state:
- Runtime version detected – Java version or .NET version currently in use
- Frameworks – Spring Boot, ASP.NET MVC, WCF, etc.
- Build tools – Maven, Gradle, MSBuild, etc.
- Project structure – module layout, solution structure
- Target Azure service – the compute target(s) you selected during configuration
This section is the baseline. It tells the tool (and you) exactly what it’s working with.
Issue Summary – The Dashboard
The issue summary gives you a bird’s-eye view of migration readiness. It categorizes issues by domain and shows criticality percentages – essentially a snapshot of how much work lies ahead.
The Issue Summary shows at-a-glance migration readiness with criticality percentages
If you configured multiple Azure service targets, you can switch between them here to compare. An app that has 3 mandatory issues for App Service might have 7 for AKS, or vice versa. This comparison is often what drives the hosting decision.
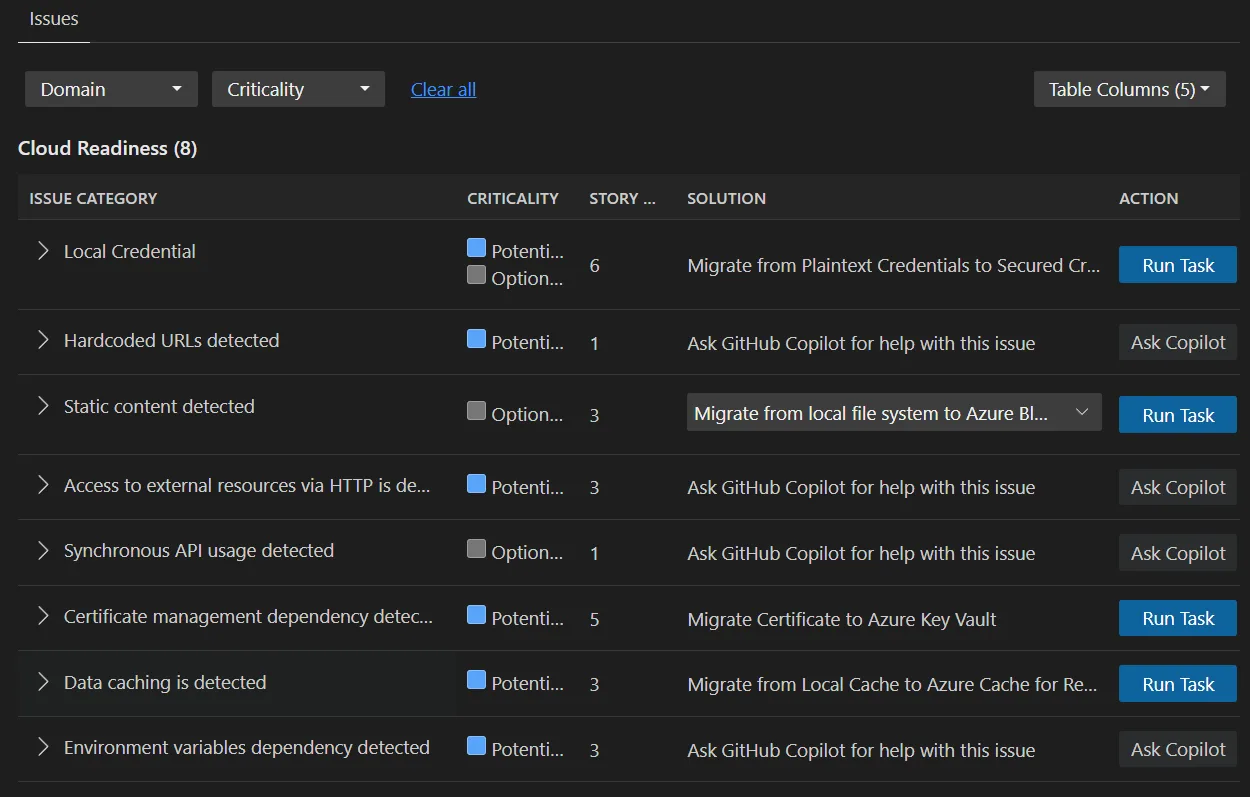
Issues Tab – The Actionable Detail
This is where the assessment becomes a to-do list. Issues are categorized by domain:
- Cloud Readiness – Azure service dependencies, migration blockers, platform-specific incompatibilities
- Java/.NET Upgrade – JDK or framework version issues, deprecated APIs, removed features
- Security – CVE findings, ISO 5055 compliance violations
Each issue carries a criticality level:
| Level | Meaning |
|---|---|
 Mandatory Mandatory |
Must fix or the migration fails. These are hard blockers. |
 Potential Potential |
Might impact migration. Needs human judgment – could be a problem depending on your specific deployment scenario. |
 Optional Optional |
Low-impact, recommended improvements. Won’t block migration but worth addressing. |
Expanding any issue reveals:
- Affected files and line numbers – clickable links that navigate directly to the relevant source code
- Detailed description – what the problem is, why it matters for your target platform
- Known solutions – concrete remediation steps, not just “fix this”
- Supporting documentation links – references to official migration guides, API docs, or security advisories
The combination of file-level precision and actionable remediation guidance is what makes this tab the operational core of the report. You can hand individual issues to developers and they have everything they need to act.
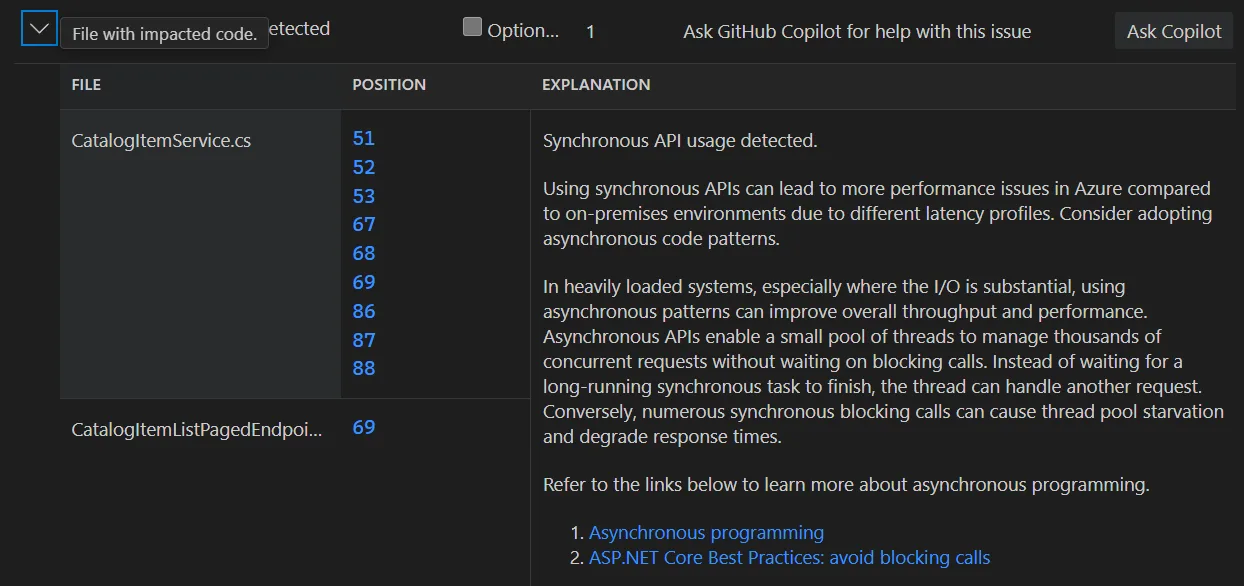
Each issue includes clickable file links, detailed descriptions, and concrete remediation guidance
Now we’re talking!
Report Operations – Share, Import, Compare
Assessment reports aren’t locked to a single developer’s machine. The tooling supports full collaboration workflows:
Export and share. Export any report from the dashboard and share it with teammates. Recipients can import the report without re-running the assessment – they see the same dashboard, the same issues, the same detail. This is particularly useful for architecture reviews where the people making decisions aren’t the ones running the tools.
Import from multiple sources. You can import reports from:
- AppCAT CLI – import
report.jsonfiles from Microsoft’s Application and Code Assessment Tool - Dr. Migrate – import app context files
- Previously exported reports – round-trip sharing between team members
To import, select Import in the assessment reports page, or use Ctrl+Shift+P and search for Import Assessment Report.
Compare assessments. Run multiple assessments with different target configurations and compare the results side-by-side. This is the workflow I recommend when you’re evaluating hosting options: run one assessment targeting AKS, another targeting Container Apps, and compare the issue counts and mandatory blockers.
Track history. Because each assessment run generates an independent report, your report list becomes a timeline of your modernization progress. After fixing a batch of mandatory issues, re-run the assessment and see the numbers drop.
The Key Insight
The assessment document isn’t just a report you read once and file away. It’s the input that drives everything downstream:
- Infrastructure planning reads the assessment to understand what Azure resources your app needs
- IaC generation uses the target compute and dependency information to produce Bicep or Terraform
- Containerization decisions depend on the containerization analysis findings
- Deployment targets are selected based on the cloud readiness analysis for each compute option
When the modernization agent creates a plan in the next phase, it consumes the assessment. Get the assessment right, and the rest of the pipeline follows. Skip it or misconfigure it, and you’ll be course-correcting downstream.
From Assessment to Azure – The Deployment Bridge
The assessment tells you where you stand. The planning and execution phases get you to Azure. Here’s how they connect – all from inside VS Code.
Phase 1: Infrastructure Preparation
From the Copilot Chat Pane, use the modernize-azure-dotnet agent and ask it to help you create a plan to migrate to Azure. The agent can accept several types of input:
- Application source code – codebase analysis to determine stack, dependencies, and resource requirements
- Assessment reports – the reports from the previous phase (this is the primary bridge)
- Architecture diagrams – pre-migration design documents in your repository
- Compliance and security requirements – organizational policies provided as docs or natural language
You can combine these in your prompt to get a tailored infrastructure plan. For example, you might prompt the agent with:
“Create Azure infrastructure based on the assessment report, following our compliance policies in docs/security-requirements.md”
Or if you’re aiming for a full Azure Landing Zone:
“Create an Azure landing zone tailored to my application’s architecture and requirements”
The agent generates two files:
| File | Location | Purpose |
|---|---|---|
| Plan file | .github/modernize/{plan-name}/plan.md |
Infrastructure strategy, proposed architecture, resource list |
| Task list | .github/modernize/{plan-name}/tasks.json |
Specific tasks the agent will perform during execution |
The infrastructure plan covers the full Azure Landing Zone design: networking, identity, governance, and security foundations. IaC output is generated as Bicep or Terraform, depending on your prompt and preferences.
Review before execute. Both files are editable right in VS Code. I adjust resource configurations, modify the approach, add constraints – then execute the plan from the modernization pane. After execution, I review the Git diff to see exactly what was generated.
CLI note: The same planning workflow is available via
modernize plan createandmodernize plan executeif you prefer the terminal. The plans and outputs are identical regardless of which surface you use.
Phase 2: Containerization and Deployment
A second plan handles containerization and deployment. From the modernization pane, create a new plan with a prompt like:
“Containerize and deploy my app to Azure, subscription: <sub-id>, resource group: <rg-name>”
This phase covers:
- Dockerfile generation – tailored to your application’s stack and dependencies
- Container image validation – ensuring the image builds correctly
- Deployment manifests – configuration files specific to your target Azure service (AKS, Container Apps, or App Service)
- Reusable deployment scripts – generated for future use, so deployments are repeatable
You can also split these concerns – prompt for containerization only (“containerize my app and create a Dockerfile”) or deploy an already-containerized application (“deploy my app to the AKS cluster in subscription: <sub-id>, resource group: <rg-name>”).
Independence and Human Control
Two design principles I really like:
Phases are independent. Skip infrastructure preparation if you already have an environment provisioned. Prepare infrastructure now and deploy later. Containerize without deploying. Each phase is a separate plan that can be created and executed on its own timeline.
Human-in-the-loop throughout. Every plan is editable before execution. Every change is Git-tracked – you can review diffs, revert commits, and audit the full history of what the agent did. The modernization agent proposes; you approve.
Summary
I’ve shown you how the assessment document is the heart of GitHub Copilot’s modernization workflow – and how the entire journey from assessment to Azure deployment lives inside VS Code. The assessment determines what gets upgraded, what Azure resources get provisioned, and how your application gets deployed – and there’s a lot more we can do with this…
The key is understanding that everything downstream depends on getting this assessment right: your infrastructure plan, your IaC files, your containerization approach, and your deployment strategy all flow from what the assessment finds. And when the Modernize CLI or multi-repo batch scenarios come into play, the assessment format and planning workflow are the same – so the skills transfer directly.
Get Started
Ready to assess your own application? Install the GitHub Copilot Modernization
extension for VS Code and run your first assessment today. You can learn more
about the full modernization workflow in the
GitHub Copilot application modernization documentation.
Have you tried GitHub Copilot’s modernization tools for migrating .NET or Java applications to Azure? I’d love to hear what you think in the comments below.
The post Your Migration’s Source of Truth: The Modernization Assessment appeared first on .NET Blog.